How do you change a signature in Outlook?
Email signatures are a perfect branding opportunity. You score professionalism points for yourself and your brand for every signed mail that a client receives.
But what if you want to change your signature in Outlook? What if you assumed a new role that requires a different signature? What if circumstances made it so that you had to change your signature to fit your job title properly? How do you go about it?
Let’s find out.
How to create a signature in Outlook
Before we discuss how to change a signature in Outlook, let us first go over how to add a signature to a new Microsoft Outlook account.
For your email signatures to automatically appear at the bottom of every new email message you send in Outlook, you must enable the “add signature” feature.
You must also remember to check the Outlook settings that enable your signature to be added to the footer of every new email you send.
Here’s how to create an email signature in Outlook’s desktop app on Windows PC:
- Open the Outlook app on your PC and click “New Email” in the menu.

- On the menu bar, select “Signature” and then select “Signatures and Stationary.”

- Select “New” and type your name. Click “OK.”
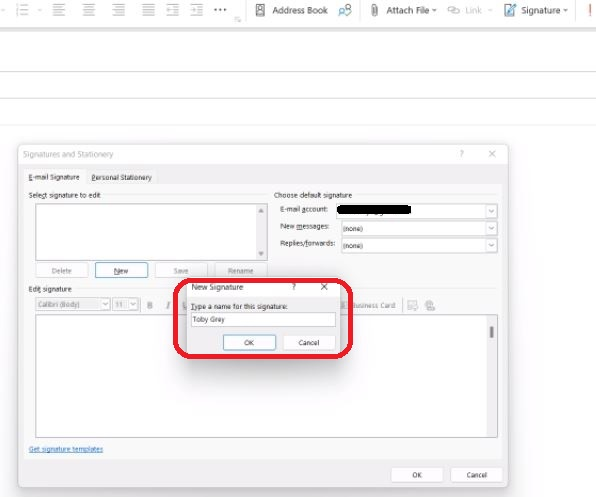
- In the “Edit Signature” box, customize your signature with your name and whatever information you wish to add, like your company’s website link and contact details.
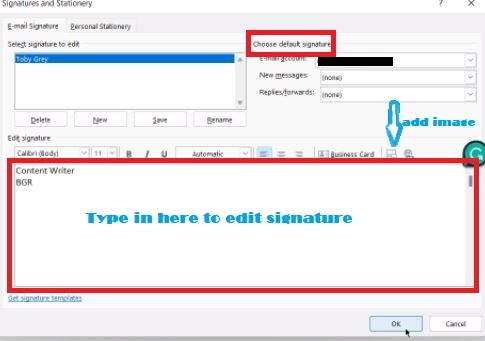
- Edit the signature block and make it look more professional. You can also add a photo or logo of your brand or company and link them to your webpage.
- Edit only the default signature setting that says “New messages.”
- Click on the dropdown list and select your name. This adds your email signature to new messages, but not to “Forward” or “Reply” messages.
- Click “OK” when you’re done and click on a message window. When you begin a new message, your Outlook signature appears at the bottom.
Pro tip – You can create multiple signatures for your various emails.
How to change a signature in Outlook
Here is how to manage Outlook email signatures that have been created in the past.
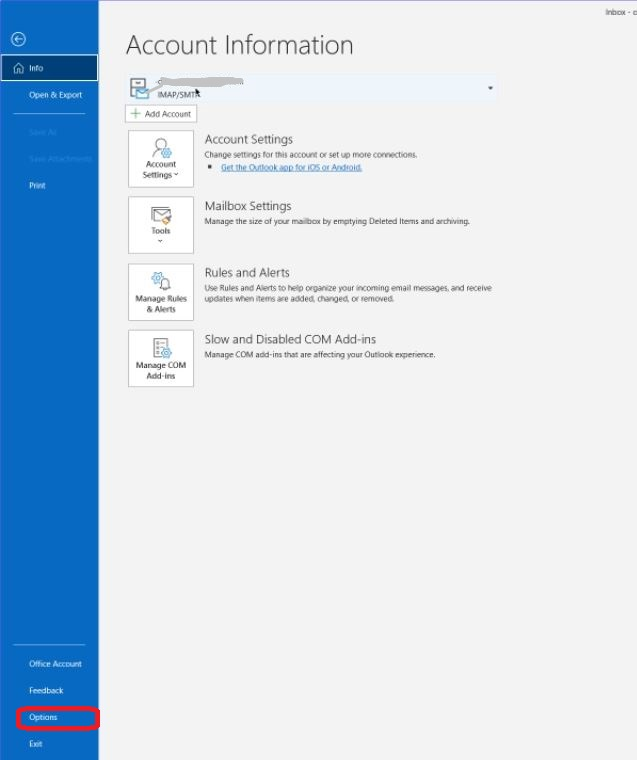
Open the Outlook desktop app and click “File” in the menu.
Next, go to “Options” > “Mail” > and then click “Signatures…” to access the “Signatures and Stationery” window.
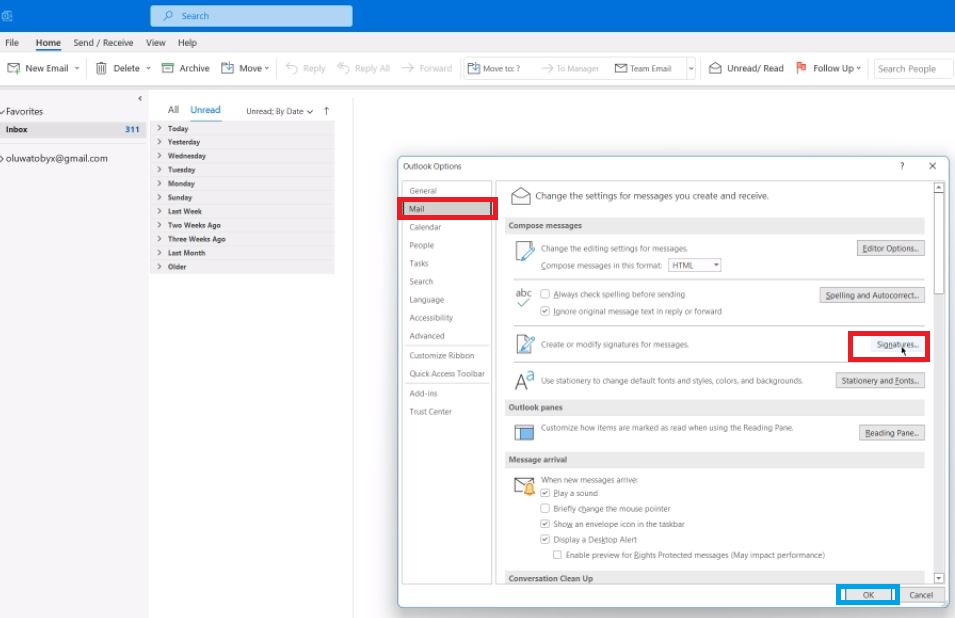
Click on the signature you would like to edit or click on “New” to design your new signature.
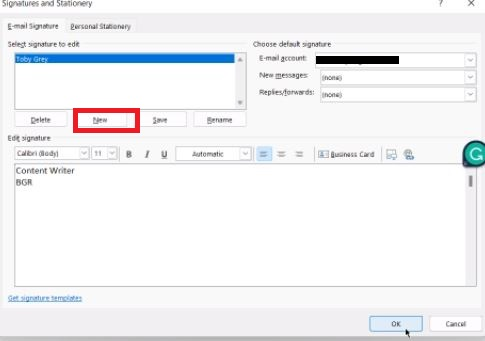
In the Signatures and Stationery window, you can make multiple signatures that can serve as different signatures for either a work account or a personal email account.
From the “Edit signature” box, you can make a new signature with the ability to change the font style and color of text and also add your company logo.
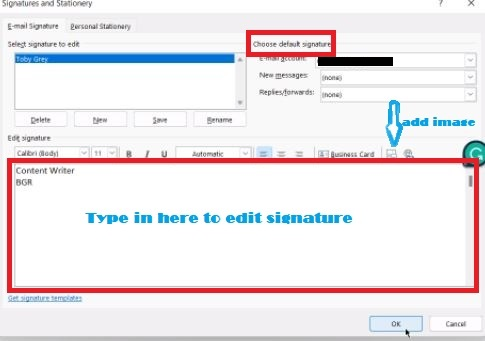
At the top right corner, where you see “Choose default signature,” you can choose to add your signature on only new messages or on Forward and Reply messages as well.
Click “OK” to save your new signature.
How to edit a signature in Outlook
Editing a signature in Outlook is similar to creating a signature. Follow the outlined steps on creating a signature above and use them to edit your Outlook email signature.
Alternatively, you can quickly run through these steps to edit a signature.
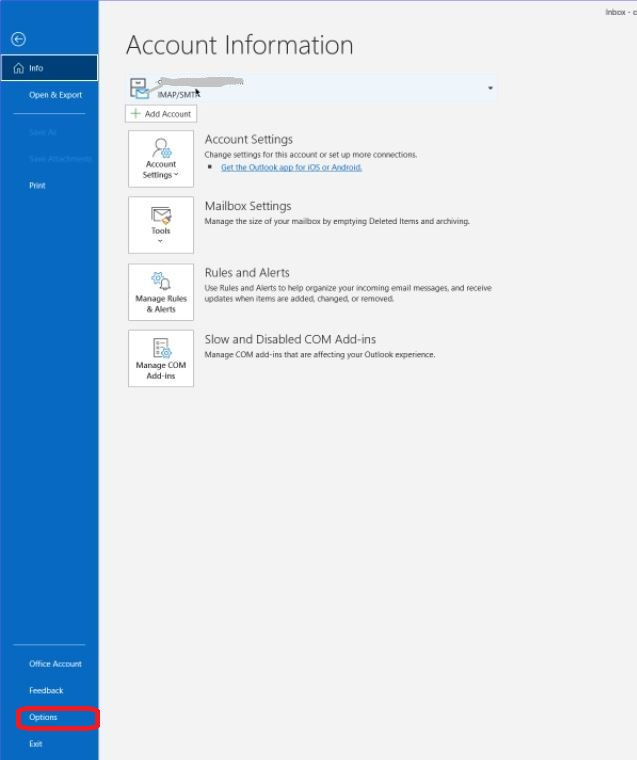
- In the Outlook app, click on “File” in the menu.

- Next, select “Options” > “Mail” > and then select “Signatures…” to allow you access to the signature window.
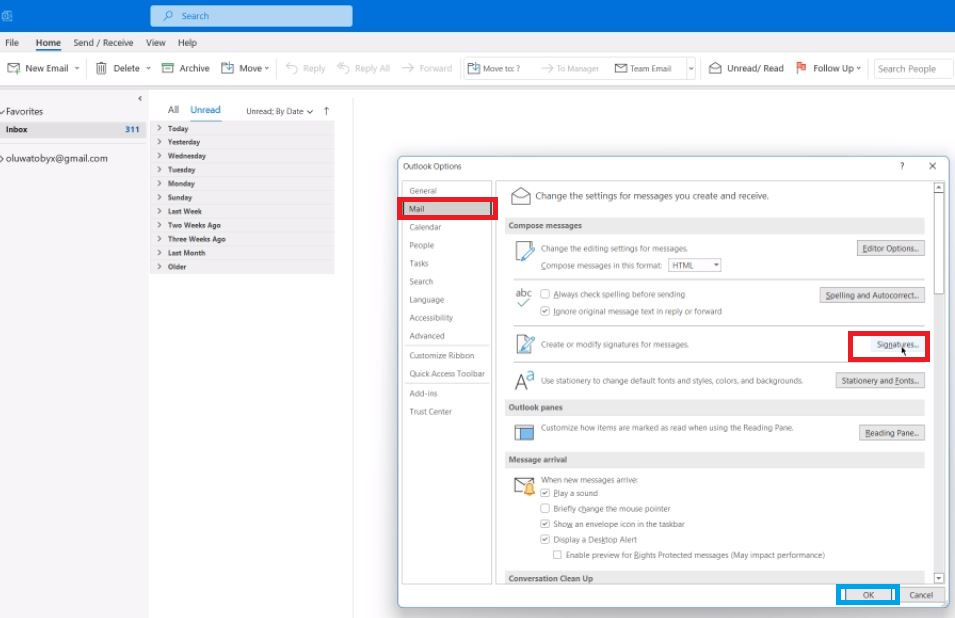
- Click on the signature you would like to edit or click on “New” to design your new signature.
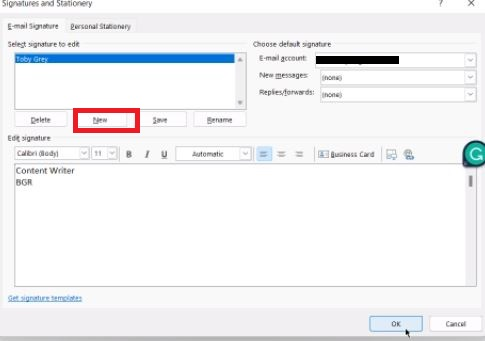
- In the Signatures and Stationery window, you can make multiple signatures that can serve as different signatures for either a work account or a personal email account.
- From the “Edit Signature” box, you can make a new signature with the ability to change the font style and color of text and also add your company logo.

- At the top right corner, where you have “Choose default signature,” you can choose to add your signature on only new messages or along with the Forward or Reply messages.
- Click “Ok” to save your new signature.
There, your newly edited Outlook signature would be displayed on the new message window whenever you want to send a mail.
Changing your signature in email messages
Here’s a way to alter your default signature in a new email.
Since the default signature is always displayed at the bottom of a new email, you can easily change the signature while editing the email.
Modify the signature by following the steps below:
- Select “Message” from the menu icon and then select “Signature” from the Include section of the Menu ribbon.

- Select your desired signature from those on the list of signatures on the dropdown list.
How to make a handwritten Outlook Signature
For some, a handwritten signature in Outlook looks more authentic than a default signature and provides a level of trust and confidence in the mind of the recipients. You can do this on your Windows PC by following the outlined steps below:
- Legibly sign on a neat sheet of white paper and scan or save it to your computer in .jpg, .png, .gif, or .bmp image format.
- Crop the file you have just saved to the computer with the Picture Tools edit feature, and save it as a separate file.
- You can save this cropped signature as a separate file by right-clicking on the image and selecting “Save as Picture.”
- Next, you would have to click “Insert Signature” and then “Pictures” to insert your signature in a document.
How to make a handwritten Outlook signature for macOS users.
To include a handwritten Outlook signature, you can scan and neatly sign on a white piece of paper and then save it to your MacBook. Complete the steps below to include your Outlook signature in your Outlook App.
- Sign legibly on a plain sheet of white paper.
- Take a clear picture or have this paper scanned to save this signature as an image on your Mac. You can save the image in .bmp, .png, .gif, or .jpg document formats.
- Next, open the just saved signature image on your Mac. Using the “Format” tab as a Picture Tool edit feature, neatly crop out your signature. You can edit the size to the exact fit you want.
- Right-click the cropped signature and click “Save as Picture” to save it as a different file.
- Next, in your Outlook App, Select the “Insert” menu and proceed to “Pictures.”
- Choose the saved signature image and click “OK.”
How to build an Outlook signature template.
If you’d rather use online sample templates for your signature, this could be very helpful.
Here’s how to develop an email signature from the signature gallery template.
- Choose a signature template you would like to replicate and download it. Next, open the downloaded template in Word.
- Highlight all, or select the parts of the template you like and copy it to the clipboard using Ctrl + C.
- Open the Outlook Application and proceed to create a “New email.”
- Paste the copied content in the email message body using Ctrl + V, then customize it to your taste.
You can add a photo or a hyperlink that can automatically redirect email recipients to a web page.
Add a hyperlink to a signature template.
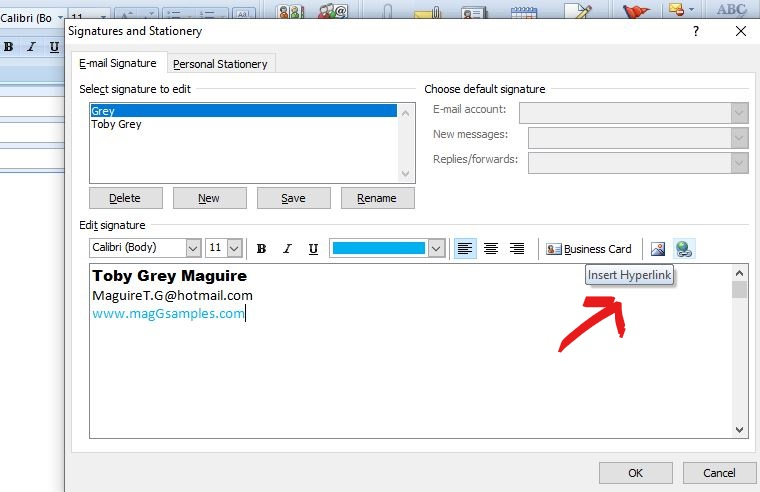
A hyperlink is a simple method to draw the attention of your email recipients to whatever particular webpage or information you wish you avail to them.
If you wish to add a hyperlink to your customized signature, continue with the following steps below.
- From the “Edit signature” box, right-click on the social media icon or type your website, select the text, and right-click to select “Edit Link.”
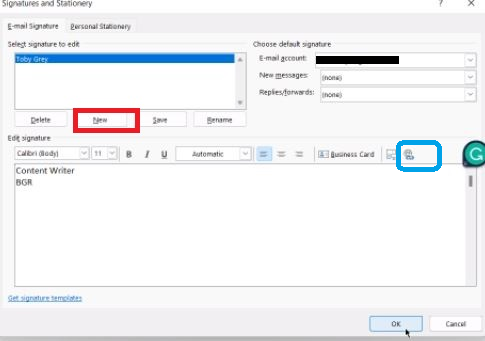
- Enter the link to your website in the “Address” field and click “OK.”
How to backup your customized Outlook signatures
If you want to save your signature in Outlook as a template for regular use, proceed with the following steps.
- Highlight all or some parts of the customized template you would like to save and copy it to the clipboard using Ctrl + C.
- From the Message tab, select “Signature” and then click “Signatures.”
- Next, click “New” and provide a name for your signature. For example, “Work” or “Personal.” This means you can have a different signature for each of your profiles in one Outlook account.
- You can now “Paste” the contents you copied on your clipboard in the “Edit signature” box with the Ctrl + V shortcut.
- Save this process by clicking the “OK” button.
Your customized Outlook signatures will be included in every new message window if you have carefully followed these steps.
How to build an email signature based on a business card
Customizing a business card (vCard) is another fast and easy method to create an email signature in Outlook.
Outlook automatically creates vCard based on stored contacts in your address book. You should create yours first if you need a vCard.
Here’s how to go about it:
- Click on “Contacts” or “People” (depending on the version of your Outlook App), “Home,” and then “New group” to create a “New contact.”
- Next, follow the steps outlined above on “Creating an email signature in Outlook” and click on the “Business Card” icon on the toolbar. Click “OK”
With all the outlined steps above, you can be confident about designing, adding, editing, and changing email signatures in Outlook.
Have fun designing your Outlook signature. And be sure to create something relatable and readable to leave your desired impression on email recipients.
Your image or brand just got more professional!
FAQs
How do I create a signature template in Outlook?
- Choose a signature template you would like to replicate and download it.
- Next, open the downloaded template in Word.
- Highlight all, or select the parts of the template you like and copy it to the clipboard using Ctrl + C.
- Open the Outlook Application and proceed to create a “New email.”
- Paste the copied content in the email message body using Ctrl + V, then customize it to your taste. You can add a photo or a hyperlink. It will automatically redirect email recipients to a web page of your choice.
How do I change my email signature in Outlook 365?
- Login to your office 365 Outlook Account and click “File” in the top left Menu bar.
- Select “Options” and then click on the “Mail” option.
- In the Mail window, click “Signatures.” Change your signature by clicking “New.”
- In the signature box, type in your preferred first and last name, then click “OK.” The name would appear in the “Select” signature box.
- Click the Edit Signature box and type in your preferred signature format. You can change the fonts, add colors, or insert a picture or a link in that same box.
- Click “Ok” to save your changed signature.
Side Note: You can only formally create one signature in Outlook 365.
How do I change my signature in Outlook 2021?
- Sign in to Outlook.com and navigate to the Settings at the top of the page.
- Click “Mail” and proceed to “compose and reply.”
- Type in your preferred signature under “Email Signature.” You can change its format and how it looks with the formatting options.
- You can choose to allow your signatures to be automatically added to each of your new messages. Conversely, you can allow only those you forward or reply to have your signatures.
- Remember to “Save” after the process.
How do I delete a signature in Outlook 365?
- Login to your office 365 Outlook Account and click “File” in the top left Menu bar.
- Select “Options” and then click on the “Mail” option.
- In the Mail window, click “Signatures.”
- Select the signature you want to delete in the “Select signature you want to edit” box. Click “delete” below the box.
- Move your cursor to “Yes,” and select it to confirm the delete on the pop-up display. Then, click “Ok” at the bottom right corner.
- Click OK to confirm this process on the Mail options window.
How do I change my email signature in Outlook on a Mac?
- Log in to your Outlook, and click on “Preferences” on the menu
- Proceed to email and click on “Signatures.”
- Go ahead to select the account you wish to use as your default signature
How do I change my signature in Outlook on iPhone?
- Open the Outlook App and navigate to your profile.
- Click on Settings and move to the Mail section.
- Tap Signature, edit it, and save.
Can you have multiple email signatures in Office 365?
No, you can’t.
However, you can create multiple signatures with alternative means such as:
-Use a signature generator.
-Download and use online templates.
-Try to use the in-app signature editor


